NSTimer 的创建 NSTimer的创建通常有两种方式,一种是以 scheduledTimerWithTimeInterval 为开头的类方法 。这些方法在创建了 NSTimer 之后会将这个 NSTimer 以 NSDefaultRunLoopMode 模式放入当前线程的 RunLoop。
1
2
+ ( NSTimer *) scheduledTimerWithTimeInterval:invocation:repeats: + ( NSTimer *) scheduledTimerWithTimeInterval:target:selector:userInfo:repeats:
另一种是以 timerWithTimeInterval 为开头的类方法。这些方法创建的 NSTimer 并不能马上使用,还需要调用 RunLoop 的 addTimer:forMode: 方法将 NSTimer 放入 RunLoop,这样 NSTimer 才能正常工作。
1
2
+ ( NSTimer *) timerWithTimeInterval:invocation:repeats: + ( NSTimer *) timerWithTimeInterval:target:selector:userInfo:repeats:
Timers work in conjunction with run loops. Run loops maintain strong references to their timers, so you don’t have to maintain your own strong reference to a timer after you have added it to a run loop.
从 NSTimer 的官方文档可以得知,RunLoop 对加入其中的 NSTimer 会添加一个强引用。
以 timerWithTimeInterval 为开头的类方法创建出来的 NSTimer 需要手动加入 RunLoop, 这样 RunLoop 才会对这个 NSTimer 有强引用。若是我们使用 weak 修饰 NSTimer 变量,在 NSTimer 创建之后加入 RunLoop 之前,将 NSTimer 对象赋值给 weak 修饰的变量,那么对导致 NSTimer 对象被释放。
1
2
3
4
5
6
7
8
9
10
11
12
13
14
15
16
17
18
19
20
21
22
23
24
25
#import "TimerViewController.h" @interface TimerViewController ()@property (nonatomic ,weak ) NSTimer *timer;@end @implementation TimerViewController - (void )viewDidLoad { [super viewDidLoad]; self .timer = [NSTimer timerWithTimeInterval:1.0 target:self selector:@selector (outputLog:) userInfo:nil repeats:YES ]; if (self .timer == nil ) { NSLog (@"timer 被释放了" ); } } - (void )outputLog:(NSTimer *)timer{ NSLog (@"it is log!" ); } @end
解决这个问题的方法也很简单, NSTimer 对象创建之后先加入 RunLoop 再赋值给变量。
1 2 3 4 5 6 7 8 9 10 11 12 - (void )viewDidLoad { [super viewDidLoad]; NSTimer *doNotWorkTimer = [NSTimer timerWithTimeInterval:1.0 target:self selector:@selector (outputLog:) userInfo:nil repeats:YES ]; [[NSRunLoop currentRunLoop] addTimer:doNotWorkTimer forMode:NSDefaultRunLoopMode ]; self .timer = doNotWorkTimer; }
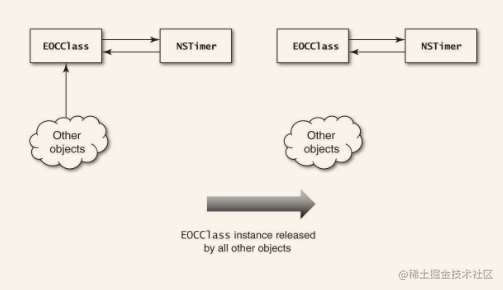
NSTimer保留环 在使用NSTimer的时候,NSTimer会生成指向其使用者的引用,而其使用者如果也引用了NSTimer,那么就会生成保留环。
1
2
3
4
5
6
7
8
9
10
11
12
13
14
15
16
17
18
19
20
21
22
23
24
25
26
27
28
29
30
31
32
33
34
35
36
37
38
39
40
41
#import <Foundation/Foundation.h> @interface EOCClass : NSObject - (void )startPolling; - (void )stopPolling; @end @implementation EOCClass NSTimer *_pollTimer; } - (id )init { return [super init]; } - (void )dealloc { [_pollTimer invalidate]; } - (void )stopPolling { [_pollTimer invalidate]; _pollTimer = nil ; } - (void )startPolling { _pollTimer = [NSTimer scheduledTimerWithTimeInterval:5.0 target:self selector:@selector (p_doPoll) userInfo:nil repeats:YES ]; } - (void )p_doPoll { } @end
在EOCClass和_pollTimer之间形成了保留环,如果不主动调用stopPolling方法就无法打破这个保留环。通过回收该类的方法来打破此保留环也是行不通的,因为会将该类和NSTimer孤立出来,形成“孤岛”
通过“块”来解决 1 2 3 4 5 6 7 8 9 10 11 12 13 14 15 16 17 18 19 20 21 22 23 24 25 26 27 28 #import <Foundation/Foundation.h> @interface NSTimer (EOCBlocksSupport )+ (NSTimer *)eoc_scheduledTimerWithTimeInterval:(NSTimeInterval )interval block:(void (^)())block repeats:(BOOL )repeats; @end @implementation NSTimer (EOCBlocksSupport )+ (NSTimer *)eoc_scheduledTimerWithTimeInterval:(NSTimeInterval )interval block:(void (^)())block repeats:(BOOL )repeats { return [self scheduledTimerWithTimeInterval:interval target:self selector:@selector (eoc_blockInvoke:) userInfo:[block copy ] repeats:repeats]; } + (void )eoc_blockInvoke:(NSTimer *)timer { void (^block)() = timer.userInfo; if (block) { block(); } } @end
在NSTimer类里添加了方法,我们来看一下如何使用它:
1 2 3 4 5 6 7 8 9 - (void )startPolling { __weak EOCClass *weakSelf = self ; _pollTimer = [NSTimer eoc_scheduledTimerWithTimeInterval:5.0 block:^{ EOCClass *strongSelf = weakSelf; [strongSelf p_doPoll]; } repeats:YES ]; }
这里,创建了一个self的弱引用,然后让块捕获了这个self变量,让其在执行期间存活。NSTimer发送invalidate消息(因为在该类的dealloc方法中向NSTimer发送了invalidate消息)。dealloc方法里没有发送invalidate消息,因为块里的weakSelf会变成nil,所以NSTimer同样会失效。
RunLoop与NSTimer NSTimer是由RunLoop来管理的,NSTImer其实就是CFRunLoopTimerRef,他们之间是toll-free bridged的,可以相互转换;
如果我们在子线程上使用NSTimer,就必须开启子线程的RunLoop,否则定时器无法生效
tableview滑动时NSTimer失效的问题 RunLoop同一时间只能运行在一种模式下,当我们滑动tableView/scrollview的时候,Runloop会切换到UITrackingRunLoopMode界面追踪模式下,如果我们的NSTimer是添加到RunLoop的defauleMode默认模式下的话,此时是会失效的。
解决:可以将NSTimer添加到RunLoop的ComonModes通用模式下,来保证无论在默认模式还是界面追踪模式下NSTimer都可以执行。
NSTimer的创建方式 自动添加到RunLoop的默认模式下
1 2 3 [NSTimer scheduledTimerWithTimeInterval:1.0 repeats:YES block:^(NSTimer * _Nonnull timer) { NSLog (@"123" ); }];
自定义添加到RunLoop的某种模式下
1 2 3 4 NSTimer *timer = [NSTimer timerWithTimeInterval:1.0 repeats:YES block:^(NSTimer * _Nonnull timer) { NSLog (@"123" ); }]; [[NSRunLoop currentRunLoop] addTimer:timer forMode:NSRunLoopCommonModes ];
注意: 如果是通过timerxxx开头方法创建的NSTimer是不会自动添加到RunLoop中的,所以一定要记得手动添加,否则NSTimer不生效
CFRunLoopAddTimer函数实现 CFRunLoopAddTimer()函数中会判断传入的modeName模式名称是不是kCFRunLoopCommonModes通用模式,是的话就会将timer添加到RunLoop的 _commonModeItems 集合中,并同步该timer到 _commonModes 里的所有模式中,这样无论在默认模式还是界面追踪模式下NSTimer都可以执行。
1 2 3 4 5 6 7 8 9 10 11 12 13 14 15 16 17 18 19 20 21 22 23 24 25 26 27 28 29 30 31 32 33 34 35 void CFRunLoopAddTimer (CFRunLoopRef rl, CFRunLoopTimerRef rlt, CFStringRef modeName) { CHECK_FOR_FORK(); if (__CFRunLoopIsDeallocating(rl)) return ; if (!__CFIsValid(rlt) || (NULL != rlt->_runLoop && rlt->_runLoop != rl)) return ; __CFRunLoopLock(rl); if (modeName == kCFRunLoopCommonModes) { CFSetRef set = rl->_commonModes ? CFSetCreateCopy (kCFAllocatorSystemDefault, rl->_commonModes) : NULL ; if (NULL == rl->_commonModeItems) { rl->_commonModeItems = CFSetCreateMutable (kCFAllocatorSystemDefault, 0 , &kCFTypeSetCallBacks); } CFSetAddValue (rl->_commonModeItems, rlt); if (NULL != set) { CFTypeRef context[2 ] = {rl, rlt}; CFSetApplyFunction (set, (__CFRunLoopAddItemToCommonModes), (void *)context); CFRelease (set); } ...... } } static void __CFRunLoopAddItemToCommonModes(const void *value, void *ctx) { CFStringRef modeName = (CFStringRef )value; CFRunLoopRef rl = (CFRunLoopRef )(((CFTypeRef *)ctx)[0 ]); CFTypeRef item = (CFTypeRef )(((CFTypeRef *)ctx)[1 ]); if (CFGetTypeID (item) == CFRunLoopSourceGetTypeID ()) { CFRunLoopAddSource (rl, (CFRunLoopSourceRef )item, modeName); } else if (CFGetTypeID (item) == CFRunLoopObserverGetTypeID ()) { CFRunLoopAddObserver (rl, (CFRunLoopObserverRef )item, modeName); } else if (CFGetTypeID (item) == CFRunLoopTimerGetTypeID ()) { CFRunLoopAddTimer (rl, (CFRunLoopTimerRef )item, modeName); } }
NSTImer和CADisplayLink存在的问题 不准时:NSTime和CADisplayLink底层都是基于RunLoop的CFRunLoopTimerRef的实现的,也就是说它们都依赖于RunLoop。如果RunLoop的任务过于繁重,会导致它们不准时
比如NSTimer每1.0秒就会执行一次任务,Runloop每进行一次循环,就会看一下NSTimer的时间是否达到1.0秒,是的话就执行任务。但是由于Runloop每一次循环的任务不一样,所花费的时间就不固定。假设第一次循环所花时间为 0.2s,第二次 0.3s,第三次 0.3s,则再过 0.2s 就会执行NSTimer的任务,这时候可能Runloop的任务过于繁重,第四次花了0.5s,那加起来时间就是 1.3s,导致NSTimer不准时。
CADisplayLink 是用于同步屏幕刷新的定时器,如果任务繁重的话,会出现丢帧现象的
解决方法:使用GCD的定时器,GCD 的定时器是直接跟系统内核挂钩的,而且它不依赖于RunLoop,所以它非常的准时。示例如下:
1 2 3 4 5 6 7 8 9 10 11 12 13 14 15 16 17 18 19 20 21 22 23 24 dispatch_queue_t queue = dispatch_queue_create("myqueue" , DISPATCH_QUEUE_SERIAL); dispatch_source_t timer = dispatch_source_create(DISPATCH_SOURCE_TYPE_TIMER, 0 , 0 , queue); uint64_t start = 2.0 ; uint64_t interval = 1.0 ; dispatch_source_set_timer(timer, dispatch_time(DISPATCH_TIME_NOW, start * NSEC_PER_SEC ), interval * NSEC_PER_SEC , 0 ); dispatch_source_set_event_handler(timer, ^{ NSLog (@"%@" ,[NSThread currentThread]); }); dispatch_resume(timer); NSLog (@"%@" ,[NSThread currentThread]); self .timer = timer;
参考 NSTimer 避坑指南
